So, we’ve all been there. You have a new sample that you need to test on a Phi-TEC II, and you need to get the sample into the test cell. But wait a minute, here we have a solid sample, and a 1/8” feed line. Or perhaps you have a reaction mix that starts reacting immediately.
What do you do? How do you get around this? Don’t panic! Read on.
Contents
Part 1 – Charging Liquid Samples
Part 2 – Charging Solid Samples
Final Thoughts
Part 1: Charging Liquid Samples
Typically, you would charge the test cell outside the Phi-TEC II and then assemble the system ready to run, but this is not always possible. For example, if a reaction starts immediately on mixing reactants. If you have this challenge, don’t worry! There are several methods to add a liquid to the test cell while the Phi-TEC II is assembled and running. Here are a few methods I have seen successfully used over the years:
- Using a vacuum
A widespread technique is to pull a vacuum on the test cell and then connect a syringe barrel to the Phi-TEC II feed line using a bent Luer adaptor. The syringe is charged with liquid. When the ball valve to the test cell on the feed line is opened, the liquid is drawn in. With careful coordination, the syringe can be topped up with more sample without breaking the liquid seal. Once the sample has been drawn into the test cell, the feed line is cleared by sucking air through the line.
A variation on this method is to fill the syringe using the barrel, and then when the valve is opened, the liquid will be sucked in, pulling the syringe barrel down. This allows additional manual pressure to be applied to the plunger if necessary.
Important note: If a vacuum is pulled on the test cell, it is essential first to create a vacuum in the main Phi-TEC II vessel – the test cells will take much more “positive” pressure than they will “negative” pressure. If you simply pull a vacuum on the test cell alone, the test cell will likely be crushed.
- Feed via syringe
Similarly, the liquid can be injected via a syringe. You are injecting against pressure, but if reaction and pressure build-up is unlikely to start when the liquid is charged immediately, then a relatively large quantity of liquid can be added in this manner. There are some downfalls to this; mainly, you have to remember to close the valve before you release pressure on the syringe! It is also likely that some of the liquid will remain in the feed line rather than reach the test cell itself (generally, this can be taken into account when calculating feed amounts). If the pressure remains low, you can even inject a syringe full of air to blow as much of the liquid as possible through the feedline. It is worth noting that a narrower syringe will allow you to exert more pressure than one with a large diameter. It may mean multiple injections, but a small syringe will enable you to inject more comfortably at slightly elevated pressures.
- High-pressure injection
It is not always possible to charge via a syringe; the reaction may occur immediately on mixing and cause the pressure to rise, or indeed the addition itself may need to be done under pressure. H.E.L offers a range of custom high-pressure injectors. Very similar to a syringe, these consist of a barrel and a moving “plunger.”
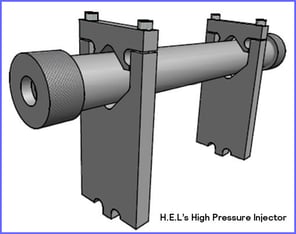
The injector is charged via a manual syringe and sealed, and then connected to the Phi-TEC II’s high-pressure gas feed line. The open end of the injector is connected to a pressure source (usually nitrogen, but any inert gas is suitable). When the time comes to charge the liquid into the test cell, the valves on the injector and the Phi-TEC II’s feed line are opened, and the nitrogen pressure forces the plunger to the end of the injector, pushing the liquid into the test cell. Even for reasonably viscous liquids, this is a handy method, although they may need a higher nitrogen pressure. The downside of injection is that it does leave some liquid in the dead volume of the feedline. This can be pre-quantified and taken into account – most simply by charging the extra to the injector initially.
- Feed pumps
If a more controlled feed is desired, the liquid can be pumped into the test cell via an HPLC pump. Theoretically, any pump may be used, but the nature of hazard studies dictates that pressure build-up is a real possibility, so a high-pressure pump is necessary. Pumps can be integrated into the controlling software to inject automatically at the desired point, or manually controlled. Once again, dead volumes in the feed must be quantified and mitigated.
Part 2: Charging Solid Samples
I’m sure I’m not the only one who has spent hours trying to feed a granular solid through the 1/8” swan-necked feed line of a low PHI-factor test cell! It can often be done with a lot of tapping and prodding but may take longer than we want to spend doing it. Here are a few things that I have done in the past in an attempt to make feeding quicker and easier: Melt the solid and feed as a liquid
This will often work with relatively low melting point solids. Heating on a hot plate or similar can be enough to produce a liquid that can be poured or injected into the test cell. Two key considerations are (1) the reagent must stay below any decomposition temperature and (2) the line is clear so that there is no possibility of residual solid forming and blocking the feed line. Often you will need to preheat the test cell and any syringe/funnel to prevent the potential of the first drop of liquid cooling, solidifying and blocking the feed line. Preheating in an oven, trace heating wire, and even a hot air gun can be used (be careful with the latter, as you can reach high temperatures very quickly).
- Creating a solution and then removing solvent
If your sample can be dissolved in a suitable volatile solvent and charged as a liquid, the solvent is then removed by evaporation. Heat and/or vacuum can be applied to drive off the solvent. Any material must be kept below decomposition temperature, and you have to be sure you have removed all the solvent. This can be done by weighing the test cell at intervals until the mass stabilizes.
- Use a test cell with a larger opening
These test cells were not available when I first started using the Phi-TEC II. They were a godsend when I first used them! The type 1D cells have a large opening in the lid that allows you to spoon in solids. It makes life a lot easier.
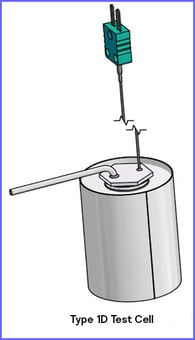
There are some downsides such as a slight increase in Phi-factor (due to the larger thermal mass of the test cell), and temperature or chemical limitations if an elastomer seal is used. Graphite seals do remove the temperature limitation but need more care when installed to ensure that the cell is leak-tight. Remember that the pressure compensation on a Phi-TEC II means that the test cell does not need to seal against particularly high pressure. If you are using a spanner to close the cap on these test cells, care must be taken not to crush the cell. Regardless, it is worth considering these test cells.
Final Thoughts
Sometimes you have to use a bit of creativity to adapt the methodology to fit your chemistry to the equipment available: universal solutions are rare. These methods are presented here with a view to provoking an “out of the box” thought process. If you have any other techniques you use for tricky samples, please share them in the comments below.